
Logry
A lightweight, extensible logger for universal JavaScript runtimes like Node.js, browsers, and Edge.
Includes scoped loggers, formatter pipelines, and modular handlers for file logging, remote delivery, or custom use.


Fullstack logging is a mess.
Logry cleans it up — universal, zero config, and out-of-the-box ready.
 Outline
- 😎 Features at a Glance
- 🌟 Output Preview
- 🚩 Installation
- 🚀 Quick Start
- 🌠 Presets
- ☄️ Core Concepts
- 🏛️ Architecture
- 🛠️ Devtools
- 🚧 Development Mode Detection
 Features at a Glance
🌍 Environment Agnostic — Works across universal JavaScript runtimes including server, API, browser, Edge, and beyond
⚡️ Zero Dependency & Lightning Fast — Zero dependencies, fully typed, minimal runtime overhead
🎨 Flexible Formatter Pipeline — Customize every step from normalization to formatting with full control
📦 Plugin-Ready Core — Easily extendable with custom handlers and lifecycle hooks to build your own logging workflows
🔍 Contextual Logging — Supports separate meta and context data for flexible and clear log enrichment
🌳 Scoped Loggers — Organize and filter logs with nested, hierarchical scopes
![]()
 Output Preview
Here’s how logs look in Node.js vs. the browser:
 Console output in Node.js |
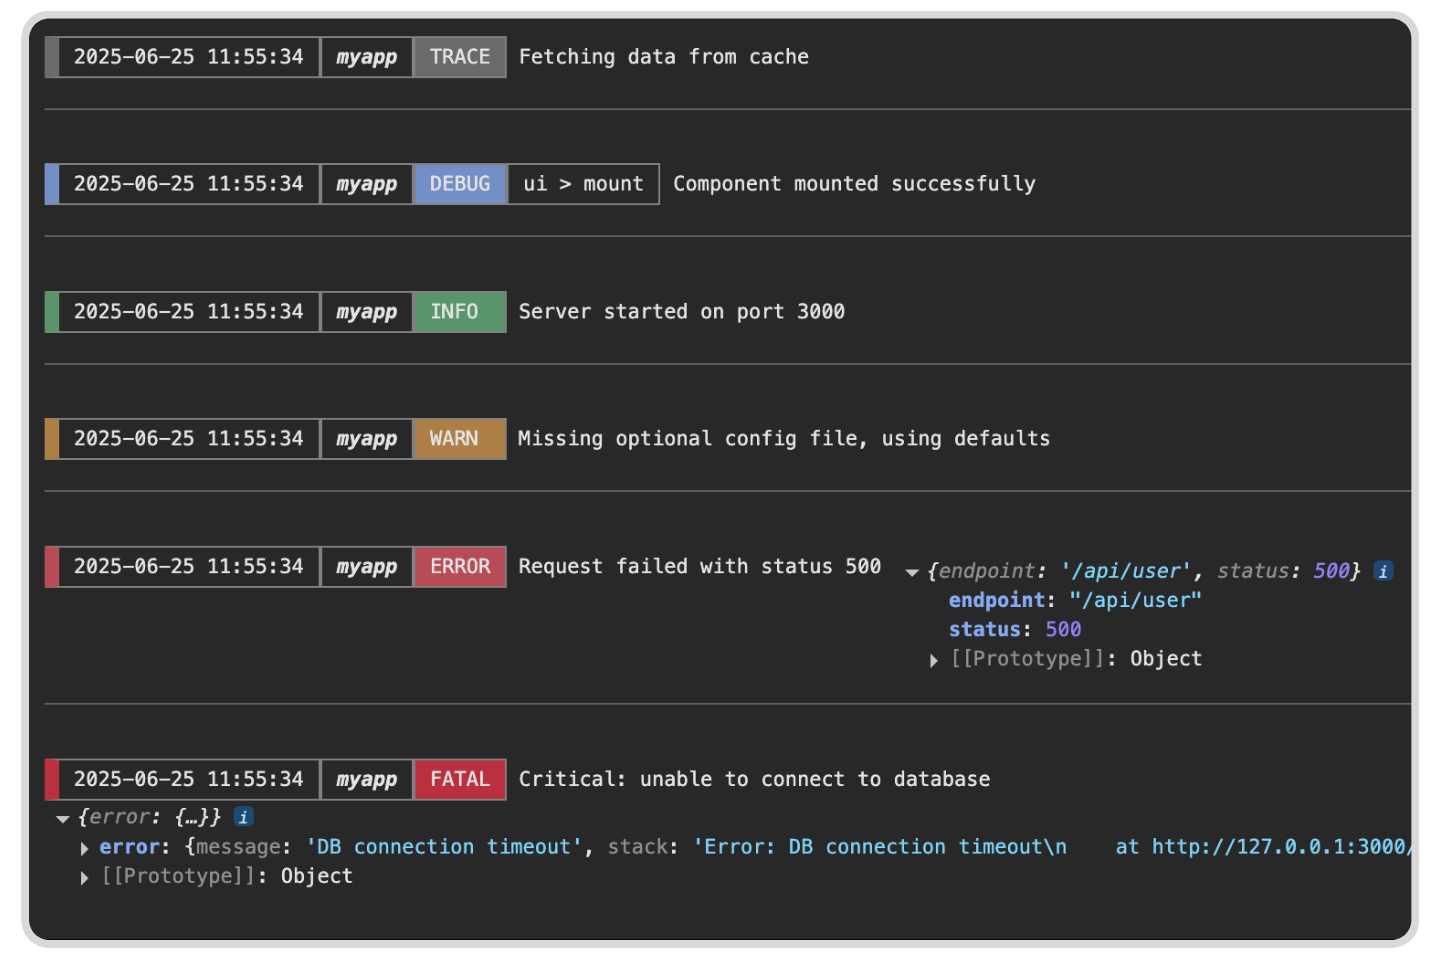 Console output in Browser |
Not your style? No worries! It’s fully customizable.
![]()
 Installation
npm install logryor use yarn
yarn add logry Quick Start
Using Static Logger Methods
The easiest way to use Logry is by calling its static logging methods.
They work instantly without a logger instance, ignore level restrictions, and default to the “pretty” preset for clean output
import { trace, debug, info, warn, error, fatal } from "logry";

info("👋🏼 Hi there! Welcome to Logry!");

warn("User session is about to expire", { user: "John Doe" }); // second argument is metadata (meta)

error("Unexpected error occurred", new Error("Something went wrong")); // you can also pass an Error
Creating a Custom Logger Instance
You can create a logger by calling logry().
By default, the log level is set to "warn", so only logs with levels "warn", "error", and "fatal" will be shown.
If you don’t specify an ID, the logger will use "default" as its identifier automatically.
import { logry } from "logry";

// Create a custom logger instance (defaults to id: 'default' and level: 'warn')
const logger = logry();

logger.info("User logged in"); // ❌ This won't be shown, 'info' is lower than the default 'warn' level

logger.warn("User login warning"); // ✅ This will be shown
A quick and easy setup to start logging right away:
import { logry } from "logry";

const logger = logry({
  id: "MyLogger",
  level: "debug", // Will show: debug, info, warn, error, fatal (trace will be hidden)
});A fully customizable logger setup when you need more control and personality:
import { logry } from "logry";

const logger = logry({
  id: "🌐 My Logger",
  level: "info",
  scope: ["auth", "api"],
  context: { env: "production", appVersion: "2.5.1" },
  preset: "verbose", // "pretty" | "pretty-expanded" | "minimal" | "verbose"
  normalizerConfig: {
    node: {
      timestamp: { style: "iso" },
      // ...
    },
    browser: {
      timestamp: { style: "pretty" },
      // ...
    },
  },
  formatterConfig: {
    node: {
      id: { ansiStyle: "\x1b[35m" },
      message: {
        customFormatter: ({ fieldValue }) => ({
          fieldValue: "\n" + fieldValue.toUpperCase(),
        }),
      },
      // ...
    },
    browser: {
      id: { cssStyle: "color: purple;" },
      context: { format: "compact" },
      // ...
    },
  },
  handlerManagerConfig: {
    // ...
  },
});![]()
 Presets
Logry offers several built-in logger presets.
Each preset is a set of normalizer and formatter configs for different log styles.
| Preset | Description |
|---|---|
pretty |
Formatted, easy to read |
pretty-expanded |
expanded output with line breaks |
minimal |
Simple output with essential info only |
verbose |
Full detail with context and depth |
To use a preset, pass it when creating the logger:
const logger = logry({ preset: "pretty" });Presets are fixed for now.
🎯 Custom presets may come in future versions.
![]()
 Core Concepts
Logry is built with modularity, precision, and developer experience in mind.
Here are the key concepts that define how it works:
 Log Level
Logry supports seven log levels, ordered from most critical to most verbose:
| Level | | Description |
| -------- | --- | ---------------------------------------------------------------------------------- |
| fatal | ❗ | Logs critical system failures. The application may crash or exit immediately |
| error | ❌ | Logs runtime errors that should be investigated and typically require action |
| warn | ⚠️ | Logs recoverable issues or unexpected behaviors that don't prevent operation |
| info | ℹ️ | Logs general operational messages, such as successful startups or actions |
| debug | 🛠️ | Logs detailed internal information helpful for debugging |
| trace | 🔍 | Logs the most granular details, every step, useful for profiling or deep debugging |
| silent | 🤐 | Disables all logging output |
The logger only outputs messages at or above the current level.
For example, if the level is set to warn, only warn, error, and fatal logs will be printed.
You can specify the desired log level when creating a logger instance
Core-level configs like level are only applied when creating a new core.
If a core with the same ID exists, those configs will be ignored, and a warning will be logged.
// Initialize a logger with a preferred level
const logger = logry({ id: "my-app", level: "debug" });
Bypass the log level filter with force
Normally, the logger will only output messages at or above the configured level.
However, you can force a log to be emitted regardless of the current level:
logger.force.error("Something went wrong!");
logger.force.info("This will show even if level is set to 'warn'");
⚠️ Use this with care—
forceis designed for exceptional situations where logs must be guaranteed to appear.
![]()
 Child Loggers
In Logry, every logger instance is lightweight and modular.
You can freely create child loggers that inherit settings from their parent — while overriding only what you need.
Creating a Child Logger
You can use the .child() method to create a scoped or customized logger:
const logger = logry({ id: "main-app", level: "info" });

const authLogger = logger.child({
  level: "debug", // override log level
  scope: "auth", // add a scope
  context: { userType: "admin" }, // inject default context
});
Child Logger Inheritance
Child loggers inherit settings by merging properties differently depending on their type:
scope: Appended
["main"] + "auth" → ["main", "auth"]context: Merged, child overrides
{ app: "main", user: "guest" } + { user: "admin" } → { app: "main", user: "admin" }formatterConfig / normalizerConfig:
Shallow merged per platform (node, browser), with child taking precedence
This keeps child loggers flexible and contextual, without needing to re-specify everything.
![]()
 Logger Core
The core engine responsible for managing log levels, shared identity (id), and optional configurations for formatting, normalization, and handlers.
- Multiple logger instances can share a single core by specifying the same id, enabling centralized and synchronized log level management across instances.
It supports dynamic runtime control of log verbosity:
setLevel(level): updates the active log levelresetLevel(): restore to the initial log level
 When calling
 logry(), the system checks the Logger Core map by id.
If found, it returns a Logger linked to that core; otherwise, it creates a new core and returns a Logger.
⚠️ Note: Core configurations are fixed per LoggerCore identified by id.
Creating a logger with an existing id ignores new core-level options and logs a warning.
ℹ️ Note: In Edge runtime environments, the Logger Core concept is intentionally not available.
This design aligns with the stateless and ephemeral nature of Edge environments.
![]()
 Handler Manager
Every Logger instance is paired with a dedicated HandlerManager,
an internal module inherited from its LoggerCore.
Where the Logger emits the log, the HandlerManager ensures your logs travel further,
writing to files, sending to remote servers, or reporting to dashboards, wherever needed 🌍
It orchestrates all registered log handlers, manages asynchronous tasks,
and provides robust strategies for flushing, cleanup, and error recovery.
- ♻️ Handler lifecycle
- Initializes handlers on registration
- Optionally handles errors via a configurable onError callback
- Disposes each handler safely when no longer needed
- 🔎 Async task tracking
- Tracks all pending asynchronous log operations
- Ensures that every delivery completes or fails safely
- ⏱️ Flush support
- Call flush(timeout?) to wait for all pending handler tasks
- Supports flushStrategy for time-based or event-driven flushing
- 🛑 Error recovery
- Catches errors during log handling
- Reports errors with handler ID and payload context via onError
- 🧼 Resource cleanup
- dispose() cancels flush strategies, removes all handlers, and clears internal states
![]()
 Architecture
Logry is designed with a focus on console output as the primary logging target.
The Platform Transporter is tailored for each environment to efficiently handle core console output.
Beyond console output, tasks like file writing, remote logging, or service integration are handled by flexible, user-defined Handlers.
This plugin-like architecture allows you to easily extend or customize logging behavior without affecting the main console pipeline.
Think of the Platform Transporter as the reliable frontman, while Handlers are the creative backstage crew adding all the magic.
This architecture ensures that:
- The console remains the central output, optimized for each platform’s specifics.
- Other output destinations can be easily added or modified by introducing new Handlers.
- The system maintains consistency and reliability, while providing maximum flexibility to adapt to various use cases and environments.
 Log Pipeline
Building on the architecture described above,
When you call any logging method on your logger instance (e.g. info(), error()),
it triggers two parallel paths internally:
 Platform Transporter: Normalizes, formats, and outputs logs to the console, optimized for the running environment.
- HandlerManager: Runs additional handlers for side effects like writing files, sending logs remotely, or custom integrations.
                Logger.log()
                    ↓
     ┌───────────────────────────────┐
     │                               │
     ▼                               ▼
  ┌──────────────────────┐   ┌──────────────────┐
  │ Platform Transporter │   │  handlerManager  │
  │ (normalize, format,  │   │  .runHandlers()  │
  │  output to console)  │   └──────────────────┘
  └──────────────────────┘             │
                                       ▼
     ┌─────────────┬───────────────────┬───────────────┐
     │ FileHandler │ SendRemoteHandler │ CustomHandler │ ...
└─────────────┴───────────────────┴───────────────┘![]()
Transporter
When a log is passed to a Transporter, it flows through three clear stages:
- 🔀 Normalization — Ensures a consistent, structured shape.
- 🎨 Formatting — Transforms the data into a readable format.
- 🖨 Output — Sends the final log to the destination console.
Note:
In Node.js, NodeConsoleTransporter lazily appends fields likepidandhostname.
This is done asynchronously to ensure that Logger.log() remains synchronous and returns immediately.
Built-in Transporters
Logry ships with platform-aware console transporters,
so your logs always show up in the right place—without any extra setup 🛠️
| Platform | Transporter | Output target |
|---|---|---|
Node.js |
NodeConsoleTransporter | Terminal console |
Browser |
BrowserConsoleTransporter | Browser developer console |
Edge |
EdgeConsoleTransporter | Platform console (plain text) |
Each transporter activates only in its matching runtime, and does nothing otherwise.
Universal by Default
Importing from "logry" gives you a universal logger with both Node and browser transporters attached:
import { logry } from "logry"; // Includes both NodeConsoleTransporter and BrowserConsoleTransporter

logry.info("Hello from anywhere");
In Node.js, logs go to the terminal. In the browser, they appear in the browser console.
⚡️ No extra configuration required.
Platform-Specific Variants
To reduce bundle size or fine-tune behavior, you can import from a platform-specific entry point:
| Import Path | Platform | Bound Transporter |
|---|---|---|
| "logry/node" | Node.js |
NodeConsoleTransporter |
| "logry/browser" | Browser |
BrowserConsoleTransporter |
| "logry/edge" | Edge |
EdgeConsoleTransporter |
Each variant includes only the relevant transporter for its environment.
import { logry } from "logry/node"; // Logs only to terminal (no browser logic)Edge Runtime Support
The "logry/edge" export is optimized for environments like Cloudflare Workers and other serverless platforms.
It uses EdgeConsoleTransporter, a minimal transporter that prints plain-text logs to the platform’s console.
⚠️ Always use logry/edge in Edge runtimes.
Other versions rely on Node.js APIs and may fail to run.
import { logry } from "logry/edge";

logry.info("Hello from the Edge");
Design Principle: Console Only
🔮 Unlike traditional loggers that mix console output with side-effects,
Logry keeps things clean and focused.
Transporters handle console output only; for other log deliveries, use Handlers.
![]()
 Normalizer
Before any log is formatted, Logry first passes it through a platform-aware normalizer.
This process ensures a consistent structure, reliable data types, and full flexibility for customization.
What it does
The Normalizer transforms a raw log payload into a normalized shape, handling core fields like:
- timestamp
- id
- level
- scope
- message
- meta
- context
- pid (Node.js only)
- hostname (Node.js only)
Each field has a dedicated normalizer, all of which can be overridden via custom logic.
Customization
Every normalizer supports a customNormalizer function, letting you override default behavior:
id: {
  customNormalizer: ({ fieldValue, raw }) => `node-${fieldValue}`, // e.g., "default" → "node-default"
  // fieldValue: the original value for the "id" field
  // raw: a snapshot of the full raw payload before any normalization
}
You can also fine-tune behavior using extra options per field.
| Field | Extra Options Available |
|---|---|
timestamp |
style, useUTC, showTimeOnly |
level |
style |
scope |
separator |
meta |
errorStackLines |
Platform Awareness
Normalization logic in Logry adapts based on the runtime environment,
allowing logs to be tailored specifically for Node.js or Browser contexts.
For example:
- Timestamps appear as full ISO 8601 UTC strings in Node, but as simplified human-readable strings in the browser.
You can define environment-specific behavior using the normalizerConfig structure.
It can be set globally in logry(...), scoped to a logger.child(...), or overridden per log method:
const logger = logry({
  // ...
  normalizerConfig: {
    node: {
      timestamp: {
        style: "iso", // Use full ISO format for timestamp in Node.js
        useUTC: true, // Display timestamp in UTC timezone
      },
      level: {
        style: "upper", // Show log level in uppercase (e.g., "ERROR")
      },
      meta: {
        errorStackLines: 10, // Limit error stack trace to 10 lines
      },
    },
    browser: {
      timestamp: {
        style: "pretty", // Use a more human-friendly timestamp format in browsers
        useUTC: false, // Display timestamp in local timezone
      },
      level: {
        style: "lower", // Show log level in lowercase (e.g., "error")
      },
    },
  },
  // ...
});![]()
 Formatter
The Formatter takes normalized log data and turns it into readable, styled output.
It supports optional color coding to make logs clearer and easier to scan.
What it does
The Formatter receives normalized data and produces formatted strings (or structured content) ready for display.
Handled fields include:
- timestamp
- id
- level
- scope
- message
- meta
- context
- pid (Node.js only)
- hostname (Node.js only)
Each part has its own formatter. All formatters support optional style customizations and can be overridden with custom logic.
Customization
Common format options apply to all formatter parts and include:
hide?: boolean;prefix?: string;suffix?: string;lineBreaks?: number;spaceAfter?: number;
Every formatter supports a customFormatter function, letting you override default behavior:
message: {
  customFormatter: ({ fieldValue, raw }) => ({
    fieldValue: `! ${fieldValue}`, // e.g., "msg" → "! msg"
    withAnsiStyle: `\x1b[42m${fieldValue}`, // Used in Node.js when `useAnsiStyle` is enabled
    cssStyle: `border: 1px solid blue`, // Used in browsers for console styling
  }),
},
You can also fine-tune behavior using extra options per part.
| Platform | Part | Extra Options Available |
|---|---|---|
Node.js |
ALL | ansiStyle, useAnsiStyle |
| - | scope |
showOnlyLatest, separator |
| - | meta |
format, indent, all InspectOptions (for format: "raw") |
| - | context |
format, indent, all InspectOptions (for format: "raw") |
Browser |
ALL | cssStyle |
| - | scope |
showOnlyLatest, separator |
| - | meta |
format, indent |
| - | context |
format, indent |
Note: InspectOptions refers to the options supported by Node.js util.inspect.
Platform Awareness
Formatter behavior automatically adapts to the runtime platform, whether it is Node.js or the browser.
This ensures that log outputs remain clear, styled, and consistent across environments.
The output behavior varies depending on the platform:
| Platform | Format output | Styling mechanism |
|---|---|---|
Node.js |
Returns { fieldValue: string, withAnsiStyle?: string } | Uses ANSI escape codes (e.g. \x1b[31m) |
Browser |
Returns { fieldValue: string, cssStyle?: string } | Uses %c and inline CSS |
In the browser, the final result will be used with console.log("%c...%c...%c...", styleA, styleB, ...), allowing for per-part CSS styling.
For example:
- Timestamps appear as full ISO strings with ANSI colors in Node.js and as simplified text styled with CSS in the browser.
- Meta shows full depth in Node, but gets a prefix like “META | “ in Browser.
- Some fields (like level) can be hidden in one platform but shown in another.
You can define environment-specific behavior using the formatterConfig structure.
It can be set globally in logry(...), scoped to a logger.child(...), or overridden per log method:
const logger = logry({
  // ...
  formatterConfig: {
    node: {
      timestamp: {
        ansiStyle: "\x1b[33m", // Yellow text for timestamp in Node.js
      },
      meta: {
        depth: null, // Show full depth for meta in Node.js
      },
      lineBreaksAfter: 2, // Add extra spacing after logs
    },
    browser: {
      timestamp: {
        cssStyle: "font-weight: bold; color: orange;", // Bold orange timestamp in browsers
      },
      meta: {
        prefix: "META | ", // Prefix meta with label in browsers
      },
      level: {
        hide: true, // Hide level field in browsers
      },
    },
  },
  // ...
});![]()
 Handlers
Handlers are modular units that define where and how a log should be delivered,
whether to a console, file, or third-party service.
They let a single logger send logs to multiple destinations simultaneously, managed smoothly behind the scenes.
💡 Handlers receive the raw log payload and process it asynchronously, enabling efficient, non-blocking log delivery.
You can add or remove handlers dynamically at runtime::
logger.addHandler(handler, id?, position?); // Adds a handler, returns the assigned ID
logger.removeHandler(id); // Removes the handler by ID
Creating Custom Handlers with BaseHandler
You can create custom handlers from scratch by implementing your own handle() method,
or extend Logry’s built-in BaseHandler to simplify the process.
🧱 BaseHandler provides core functionalities such as payload normalization, formatting, and JSON serialization,
plus a safe execution flow, so you only need to focus on implementing the actual log delivery logic.
The key method to implement is:
abstract handle(rawPayload: RawPayload): Promise<void>;Here are some useful protected methods you can use inside your custom handler:
| Method | Signature | Description |
|---|---|---|
normalize |
(rawPayload: RawPayload) => NormalizedPayload |
Normalize the raw log payload into a consistent format. |
format |
(normalized: NormalizedPayload) => FormattedPayload |
Format the normalized payload into a human-readable or styled format. |
toJson |
(rawPayload: RawPayload, options?: { useNormalizer?: boolean; space?: number }) => string |
Convert the raw payload into a JSON string, optionally normalized and pretty-printed. |
Example implementation:
import { NodeHandler } from "logry/handlers"; // 📦 Use built-in handler classes from the "logry/handlers" module.

class MyCustomHandler extends BaseHandler {
  async handle(rawPayload: RawPayload) {
    const normalized = this.normalize(rawPayload);
    const formatted = this.format(normalized);
    const message = `${formatted.level} | ${formatted.message}`;
    // Or for JSON output: const message = this.toJson(rawPayload)
    await sendToExternalService(message);
  }
}

logger.addHandler(new MyCustomHandler()); // Register the custom handler
Platform-Specific Handlers
For more advanced scenarios, you can extend platform-specific base classes such as:
NodeHandlerBrowserHandlerEdgeHandler
These classes build upon BaseHandler, and additionally expose a platform-optimized compose() method
that helps you generate the final log message string based on your formatter config and platform constraints.
Example implementation:
import { NodeHandler } from "logry/handlers"; // 📦 Use built-in base handlers from the "logry/handlers" module.

class MyCustomHandler extends NodeHandler {
  async handle(rawPayload: RawPayload) {
    const message = await this.compose(payload); // Async only in Node.js to append pid and hostname
    await sendToExternalService(message);
  }
}
This makes it easy to build reliable and composable handlers,
whether you write files, send to remote servers, or push logs to cloud ingestion pipelines ☁️
![]()
 Devtools
Logry includes small tools to help you debug and inspect logger internals.
inspectLoggerCores()
List all registered LoggerCore instances.
import { inspectLoggerCores } from "logry/devtools";

inspectLoggerCores();
Helps you verify how loggers are created and linked.
inspectHandlerManagerConfig(logger)
Show the resolved handler config for a given logger.
import { inspectHandlerManagerConfig } from "logry/devtools";

inspectHandlerManagerConfig(myLogger);
Good for checking which rules and tasks are active.
![]()
 Development Mode Detection
This function detects whether the runtime is in development mode.
It is primarily used to control internal logging and error reporting within the library, such as internal-log and internal-error messages.
In
Node.js, it checks the NODE_ENV environment variable:- Returns true if
NODE_ENVis not set to 'production'. - Defaults to true (development) if
NODE_ENVis undefined. x
- Returns true if
In
Browsers, it checks the global flag__LOGRY_DEV__:- Returns true if the flag is truthy.
- Defaults to false (production) if undefined.
This setup assumes Node defaults to development mode for easier local testing, while browsers default to production to avoid unnecessary debug logs.
![]()